Wednesday, February 23, 2011
Advanced Cold Process Class
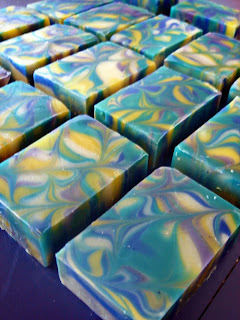
If you already understand the basics of cold process soapmaking and are looking to beautify your bars, this class is for you! Nothing sets your product apart from the rest quite like eye-catching swirls. Plus, it is truly gratifying and SO much fun! Kat will demonstrate both "in-the-pot" and advanced linear swirling techniques. Walk out with at least 2 bars of swirled soap, and the confidence and ability to express your creativity with color.
Class Offered:
Sunday Mar. 13th, 2pm, $35
Sunday Apr. 3rd, 2pm, $35
Sunday Apr. 17th, 2pm, $35
Sign up in the store, over the phone at (360) 676-1030, or online.
Saturday, February 19, 2011
Maxed-Out Soap Bar
Friday we had the pleasure of hosting a group from the Max Higbee Center at our melt-and-pour Soap Bar. They are a fantastic non-profit organization that provides recreational opportunities for people with developmental disabilities. Normally, we fit up to 8 people at the copper table, but we managed to get at least ten including helpers. We made soap with them last year and it was a huge hit! Everyone made two bars of soap and chose their own scents, colors and molds. The soap came out great and we can't wait to see them again.
Thursday, February 17, 2011
A Sure Thing
Out of all the hundreds of molds and fragrance options, you really can't go wrong with our best selling Oatmeal Milk and Honey fragrance oil paired with it's matching mold. I have yet to come across a customer who didn't fall in love with this scent. It is the perfect balance of sweet honey, creamy and soothing milk, and warm and toasty oatmeal. A truly comforting and mouth-watering aroma that makes me sigh a big "ahh" after smelling it. Plus, the mold is detailed enough to allow the most creative touches, or add your own ground oatmeal for a luxurious scrub. Try the goats milk or honey melt-and-pour soap base, or swirl them together. You won't be disapointed :-)
Friday, February 11, 2011
Sandalwood Swirl
Take a look at this crazy swirl! It's kind of like making a funnel soap... only without the funnel :-) I simply split my batch and colored one half with brick red oxide (left the other half neutral) and alternated pouring each color in the very center of my loaf mold. The colors stack up and spread across, creating a unique pattern with each slice. Is it just me, or do these bars kind of look like bacon?
Sandalwood is just one of the many masculine fragrance oils that we carry at Bramble Berry and Otion, and it pairs so well with this "woodsy" swirl. For thinner, more detailed lines, pour at a light trace and alternate between each color as much as possible. The longer you pour one color, the more of a solid blob of it you will get, so quick pours work best.
Thursday, February 10, 2011
Valentine's Day Inspiration
Surprise your Valentine this year with some handmade aromatic gifts. Heart soaps are so easy with our melt-and-pour soap bases and wide variety of themed molds, colorants, and fragrances. I used dried rose petals to decorate the tops of my heart-embed bars and couldn't resist throwing in some iridescent pink glitter in my marbled soap project.
Create a fun "love potion" spray with Love Spell fragrance oil and water, or add Ylang Ylang essential oil to some warmed up Sweet Almond or Apricot Kernel oil for a romantic massage. Prepare a lovely bubble bath or salt scrub, lotion or lip balm just for the one you love. The possibilities are endless!
Wednesday, February 9, 2011
Soap School
Last week we had a three-day soap training at Otion with Ralph, who traveled all the way from Lebanon. We spent three days covering everything from liquid soap to herbal infusions in cold process. Ralph was such a pleasure to teach because he picked up on everything instantly, which made it possible to get through a very packed schedule with no problems.
Above, Ralph and Anne-Marie are making the first stage of rock soap. Ralph had such a steady hand, which really came in handy when pouring layers in a 3D mold.
Jill Heuser from Northwest Scents came in to teach lotions and Kat taught colorants, melt-and-pour and cold process. Anne-Marie did some really unique soap projects (including Floap!) and put up a post with more pictures at Soap Queen.
Above is Ralph, the new swirl champ. Again, he really was a quick learner!
Lucky us, we had the fun of using a prototype vertical mold that hasn't even come out on Bramble Berry yet! You pour cold process soap on each side and pull out the middle divider to create a perfect layer. With this mold design, you can create a very interesting swirl in the center that appears in each cut bar.
Thank you very much for making the trip, Ralph. We had a blast teaching you and wish you and your family the very best with your soap business. Keep up the great work!
Subscribe to:
Posts (Atom)