Friday, January 28, 2011

Go Vertical!


Hi everyone, it's Kat, and I'm playing with some fun cold process layering techniques that are simple and very striking. You can do this a couple different ways; (1) Use a vertical loaf mold, or (2) customize your regular loaf mold with an insert piece. Above shows results from both methods. The yellow and pink swirl was made using yellow mica and fuchsia labcolor in a vertical mold.

A vertical mold is designed to stand up like a tower and you pour into it from the top. It is lined with hard plastic side pieces and has a removable divider insert that goes down the center, which you pull out after pouring colored soap on each side to create a layer. To swirl, simply dip a long stir stick to the bottom of the mold and give it a gentle turn. I really love how each side came out perfectly flat and uniform with zero soda ash.


The other bar is made using a blend of emerald and blue mix labcolors layered next to fuchsia again. This time, I used my regular loaf mold (lined of course!) and cut out a piece of cardboard that fit the length of the mold. I covered my cardboard piece with some freezer paper, which may or may not have been necessary, and placed it in my mold as a divider. Then I poured my two colors evenly at the same time on each side of the divider, gave it a shake to settle the soap and removed the insert. I ended up with a very crisp layer and it was super quick and mess-free. I used a tester fragrance in this batch and found out that it discolors very dark, which created that funky coloration on the outside where it oxidized. Wish I could say I planned for that!

Wednesday, January 26, 2011

Gel Phase in Testers

I love testing new scents in cold process soap because I get to feel like a mad scientist. You never know what you're going to get-- some scents immediately seize or accelerate, others turn crazy colors, some over-heat and some go through gel phase, like the examples below.


What is Gel Phase anyway? According to Anne-Marie on the Teach Soap Forum, "Gel phase simply refers to a part of the saponification process where the soap gets extremely warm and gelatinous. Soap that has not gel-phased is still soap. There is nothing wrong if your soap does not gel phase. You will find slight color and shine variations in gelled versus ungelled soap. Some soapers prefer not to have their soap gel at all so do not insulate. Again, it is a personal preference."

Saturday, January 22, 2011

Anything Helps


Thanks to our good friend and customer, Kelly Ring of Vital Earth Traditions, we at Otion and Bramble Berry are helping her donate soap to the flood victims in Australia where approximately 200,000 people have been affected in an area larger than France and Germany combined. Thousands have been forced to leave their homes and some families have lost everything.

If you are interested in donating to help Queensland, please visit Premier's Disaster Relief Appeal for further information. You can donate by mail by making checks payable to:

The Premier’s Disaster Relief Appeal
ABN: 69 689 161 916

Checks should be posted to:

Premier’s Disaster Relief Appeal
C/O Department of the Premier and Cabinet
PO Box 15185
City East QLD 4002

Please do not send cash.

Your contribution is very much appreciated!

Thursday, January 20, 2011

Mangosteen Fragrance Oil

We're bringing in the New Year with new fragrances, and Mangosteen is already on my favorites list. It is absolutely bursting with fruity goodness and is a combination of mangosteen, guava, and green melon swirl finished with a succulent undertone of juicy yuzu nectar and coconut palm. In the bottle, it smells a bit like tutti fruitti or a fun bubblegum, but the fragrance does lose some of its tarty fruit notes in cold process soap. It discolors yellow in MP and light tan in CP soap and is great in lotions and sugar scrubs. Also, it tends to go cloudy in liquid soap. I think of it as a little vacation for my nose!


Here's a list of our most popular scents of 2010. No surprise at the #1 spot!

1. Oatmeal Milk and Honey (goes tan in soap)
2. Energy (not safe for gel candles)
3. Vanilla Select (discolors brown)
4. Lavender Fragrance Oil
5. Sensuous Sandalwood
6. Island Coconut (discolors brown)
7. Relaxing (discolors brown)
8. White Tea and Ginger (mutates in cold process soap)
9. Plumeria (accelerates trace in cold process)
10. Yuzu Cybilla

Wednesday, January 19, 2011

New Fragrance at Otion!

We are excited to add Sweet Meyer Lemon to our selection of fragrance oils! This juicy new scent is more complex than your basic lemon and perfect if you are looking for something fresh and uplifting with fun floral notes. Over at Bramble Berry, this fragrance is affectionately referred to as ‘Sweet Tarts’ because it’s such a sweet, happy fragrance. Think of a lush, Caribbean garden bursting with the aroma of sweet lemons, horned melons, succulent kiwis, and ripe pineapple wedges. Sweet tropical florals complete this island wonder and some have compared it to the ‘Caribbean Salsa’ fragrance by Slatkin candles. We love how it performs in CP and MP soap.

The display soaps are made using a layered marbling technique with melt-and-pour soap similar to the Naid Soap Arts Snowflake Project at SoapQueen.

Friday, January 14, 2011

Doesn't Get Much Cuter Than This!


The kids are going to love it! Here are all the molds you need to make your very own melt-and-pour soap farm:

Tractor Mold
Cartoon Cow Mold
Cowboy Boots Mold
Horse Mold
Farm Goat Mold

Rooster Mold
Farm Pig Mold
Sleeping Farm Cat Mold

Wednesday, January 12, 2011

Candle-Making: The Benefits of Beeswax

There are many choices of wax for candle-makers; from inexpensive petroleum-based paraffin to vegetable-based soy or palm wax. With it's beautiful golden shade, beeswax is a popular choice simply because it is easy to work with, it's all-natural, and it burns longer and cleaner than candles made with most other waxes. Beeswax is a substance secreted by the worker honey bees used for the construction of their honeycomb. It has a wonderfully pleasant honey aroma when burned in a candle. After spending so much time around fragrance oils at Otion on a daily basis, nothing beats the natural scent and ambiance of a basic beeswax candle at the end of the day.

Also, this wax is very strong! Your candle might dent if you drop it, but it will not shatter. We sell our beeswax in granule pastille form for easy measuring and convenience. Give it a try, I think you'll like it!

Friday, January 7, 2011

Battle of Discoloration

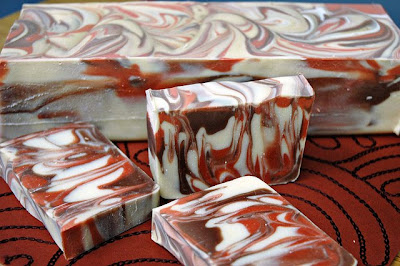
We've been busy testing lots of potential new fragrances in cold process soap, and I came across a yummy scent called Vanilla Hazelnut that I made in a four pound batch. Here's the thing, vanilla is the main ingredient so I know it is going to turn brown over time. This is true for most dessert -type fragrances because they generally contain vanilla.

To battle discoloration, you can add some titanium dioxide to lighten your soap. If you are swirling, it works even better to leave the scent out of just the titanium dioxide part for more of a true white color. Then swirl it in with the scented/colored soap so you at least get some contrast. Here's my creation after 24 hours:


I split my batch at a very light trace into three containers, one for each of the following colors:

1. About 1/2 teaspoon of Titanium Dioxide
2. About 1/4 teaspoon Brick Red Oxide blended with 1/4 teaspoon Copper Sparkle Mica
3. About 1/4 teaspoon Cappuccino Mica

Start stick blending your lightest color first so that you are not dipping any dark brown into your white. Hand stir the fragrance into each container of raw soap at the very end to keep the consistency nice and thin. When we test a new fragrance, we don't know if it could suddenly act up in our cold process batch and acceleration trace, so we add scent at the end.

Now for the fun part! Start pouring each color into your lined mold in a spontaneous manner. It does not have to be perfect. I start with white and then go across in an "S" pattern with one of my colors, then pour another strip of white, and alternate the "S" pattern again with another color until the mold is full. The most important tool you will need for finishing your swirl is a rubber spatula. Make sure it touches the bottom of your mold and create a figure-eight pattern from one end to the other without lifting the spatula. Done! Now, let's see how well the colors hold up at the end of the curing time in four weeks. I expect the white to end up at a medium to light tan color.

Wednesday, January 5, 2011